Meet Nathan
Meet Nathan Tensen WooleryMusician, Educator, Plays for a Living Nathan knows that sometimes you do the jobs you have to do until you can do the jobs you want to do. When the Wonder Bunch...


Is it just us, or does everything seem to be growing much faster now that spring has arrived? Our little ones are sprouting up like dandelions, and our indoor garden is taking root as well. As the warmer weather creeps up on us, we wanted to share some of our garden-starter ideas to bring a little of the outdoors inside!
Our family has been working toward reducing our waste, and when waste is necessary, composting or recycling anything we can. Store-bought fruit often comes in plastic boxes which are perfectly vented to work as mini-greenhouses for an indoor garden of starter seedlings!
We also found that for our home, a really cool DIY compost bin made a fun family project, and maintaining it is a chore we are all able to share in. Any time you can share a task or chore with children, they begin taking more interest in the process, and such a big undertaking becomes a point of pride for every member of the family. If your family isn’t interested in maintaining a compost bin, finding a designated spot in the corner of your yard for organic waste can work very well.
Here is a link that will help you find and DIY your own compost bin at home, or you can find some really cool commercial bins and barrels online. It doesn’t have to be anything fancy or top of the line. It’s just a home to grow some truly high-quality dirt!
The easiest answer is: anything that used to be alive. Fruit cores, vegetable peelings, scraps, hair, eggshells, even coffee grounds and tea! All organic matter will break down in your compost box, bin, or barrel. Some of it will just take longer than the rest. Banana peels are especially slow to break down, but if you shred or chop the peels into smaller pieces, they’ll get there!
It’s important to have a good mix of dry, carbon-producing refuse (think brown leaves, hay or straw, even uncoated paper) and wet, nitrogen-producing refuse (last night’s salad leftovers, this morning’s coffee grounds and egg shells). Keep your compost balanced by adding hay or paper shreds every time you add your wet compost components.
Your mixture should be turned, raked, or otherwise aerated about once a week. While compost will always smell like, well, dirt, it’s important to note that adding a lot of meat, fish, or high-fat foods will create a much more pungent pile.
Now that you have your own personal supply of black gold (or you’ve purchased a bag of soil from your local garden shop — we’ll never even know!) it’s time to start your mini garden. Did you know that you can grow new plants from a lot of the produce you already have in your home?
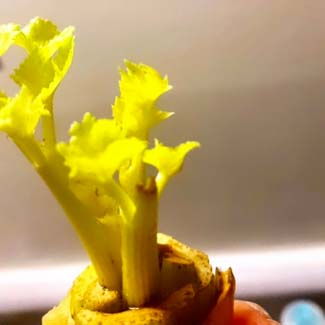
Instead of pulling ribs off of your celery one at a time, cut about 2 inches from the bottom. Set your 2” celery base in a cup of tap water about 1” deep for three to five days, watching to be sure the root doesn’t begin to rot. Soon, you’ll see new leaves begin to grow out of the top of your celery. Now is the time to plant your new celery in a 1-gallon pot. Keep the soil moist, and leave in a cool, sunny window. Celery is a hungry little plant and likes to be fed new compost every week. You can begin harvesting your newly regrown celery once it reaches 3”.
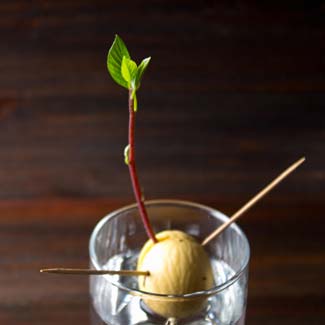
Your avocado plant won’t likely ever produce new fruit, but it makes a beautiful green plant that thrives well indoors. Start by carefully removing your avocado pit (using a spoon, not a knife) and rinse it carefully in warm, not hot, water. Once clean, wrap your avocado pit in a damp paper towel or cheese cloth, and place it in an opened plastic bag in a cool, dry place.
Check weekly to ensure that the cloth is still damp, but that the seed has not begun to mold. Roots should appear within two to three weeks, and you can plant your seed in soil once the roots have reached three inches long.
If your children want to witness the whole process in real time, you can also suspend your avocado pit from toothpicks over a glass of water. They’ll have a chance to witness the roots sprouting, and even growing down the length of a glass before planting.
Remove your strawberry seeds however you like. Some people prefer to press their strawberries through a strainer and retain the seeds. Others like to slice the outermost layer off and bake them dry before simply rubbing the seeds off the strawberry’s flesh. Once you’ve collected your seeds, put them in the freezer. Freezing and then thawing your seeds in a dry, air-tight container mimics the seasonal process strawberries usually go through, and this simulated spring thaw prompts seeds into maturation.
We like to plant our seeds in the plastic box they’re sold in at the store. These boxes create their own greenhouse effect, keeping the baby seedlings warm and moist while the ventilating holes keep them from mildewing. Soil should be slightly acidic (using high-sulfur foods or sulfur powder will achieve this) and kept very moist. Once you see leaves beginning to grow, you’re ready to transplant!
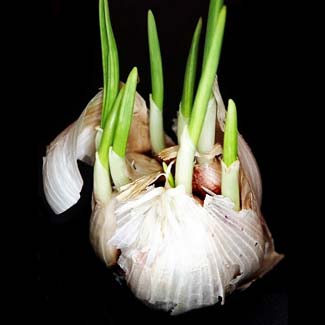
Garlic greens are so easy to grow from the bulbs you likely already have lying around your kitchen. In fact, if you ignore your garlic bulb too long, it’ll likely start sprouting without any help at all!
Take your bulb apart and let your child plant each clove somewhere they will pay attention to it. These are especially fun, as they will be able to watch the growth more easily. Our children like using egg shells that they’ve drawn faces on as mini planters. When the garlic greens grow out of the top, the children like to name our little garlic buddies. These aren’t only cute, but so handy to keep around!
If you are using eggshells, you can plant the greens, eggshell and all, into your garden once your greens have grown to about an inch in height.

Pepper plants are almost foolproof and take root quickly. Remove seeds from your next sweet pepper and leave them in a damp paper towel in an open plastic bag in a warm spot. The top of your fridge works very nicely! Viable seeds will sprout in about seven days and can be planted. We like to use egg cartons to start pepper plants (and sweet pea pods!), as this makes it easy to bring the little sprouts inside on cold nights.
While we love watching our little gardeners grow, we would love your green-thumb hacks to help us keep their garden growing as fast as they are. Leave us your tips and tricks by dropping a comment on our Instagram, or email us at Hello@WonderBunch.Com.
Starting a home garden is a fun, messy, delicious way to teach your little ones about the food we eat, the work farmers do to keep our earth healthy and growing, and to start important conversations about topics like conservation, the environment, and pollination. Soon, you’ll have the option of exploring these ideas together in our upcoming app Pollination Station! We can’t wait to share it with you and your little growers. Keep an eye out for it, and sign up for our Monthly Newsletter to find out about new apps, contests, giveaways, and updates to our Wonder Bunch World!

Meet Nathan Tensen WooleryMusician, Educator, Plays for a Living Nathan knows that sometimes you do the jobs you have to do until you can do the jobs you want to do. When the Wonder Bunch...

Did you know that spending just two hours a week in nature could make you happier and healthier? It’s true, according to a new study published in Scientific Reports (as reported in this article by...